
- Add New
Purchase Button:
This will bring up a list of all current parts that you have in your inventory.
Simply click on the part that you wish to add a new purchase for and then fill in the details in the Part list view in the Vendor screen.
- Import:
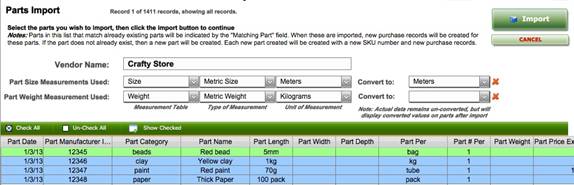
You can import a list of purchases from a csv file.
In order to do this you will need to create a csv file that contains a list of your part purchases with headings that match the correct fields to map them to the database.
# IMPORTANT NOTE: If these headings do not match exactly the import function will not work as the fields will not be able to be mapped.
To help you do this we have created a blank csv file for you that you can download from here, which contains the headings that you require.
Heading Description
Explanations:
- Part Manufacturer Item ID:
This is the most important field. If
this matches a current manufacturer id the purchase will be adding to an exist
part in your inventory. If there is no
existing matching ID then a new part entry will be created.
If there are duplicate manufacture ids in your csv file for more than one part
they will not get imported.
- Part_Category:
Enter a category for the part
- Part_Description
Enter a part description
- Part_Name:
Enter a part name
- Part_Size
Enter a part size
- Part_#_Per
Enter the total number of parts per bag/pack/wire length etc.
- Part_Date
Enter the purchase date
- Part_Per
Enter a description for the unit of measure, ie bag/roll/pack etc.
- Part_Price
Enter the total price of the purchase
- Part_QTY_Purchased
Enter the number of bags/packs/rolls of wire etc. purchased
- Ship_Cost
Enter the shipping cost
- Tax_Inc_Flag
Enter 1 if Tax is included. Enter 0
If tax is not included
- Tax_Percent
Enter the Tax amount as a decimal.
0.1 = 10%, 0.5 = 5% etc.
- Vendor_Order_#
Enter a Vendor order number (if applicable)
Import Instructions:
a) Download a blank copy of the csv file from here and save this to your local machine.
b) Fill in the details of your purchases as per the header descriptions above and save the file with a new name so you can use the blank template again as required.
c) Select the “Import” button option and select the csv file that you have saved with your purchase information and click ok.
d)
Select the correct Tax option to use the tax
rate from the sheet or from your Admin settings.

e)
Review the information presented in the list
view and select Import if correct.
f) Review the final imported data and make changes if required.
- Export Purchases:
You can export a list of purchase history to excel.
Simply click the Export Purchases button and an excel file will be
created on your desktop containing the purchase history details.
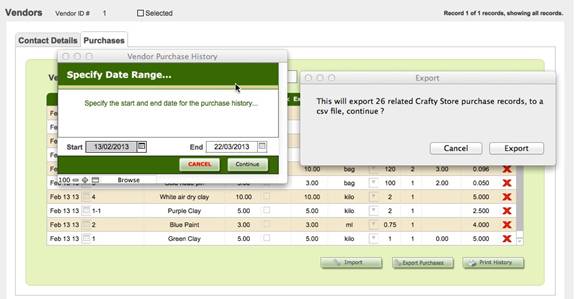
- Print
History:
You can print a history of purchases directly to your printer as well.
Simply click the History button and print the list that is created on
your printer.
